This Post May Contain Affiliate Links
In compliance with the FTC guidelines, please assume that some of the links on these posts and sites are affiliate links (Amazon or others) from which I may earn a small compensation/commission from sales of certain items at no extra cost to you from qualifying purchases.
Anytime you see a link that looks like “astore.com, paid link, #ad, #CommissionsEarned or Amazon/Amazon.com/ca,”… it can be assumed that it is an affiliate link.
To learn more, follow the link below.
Guitar Truss Rods
What Is A Truss Rod?
Truss rods are not a new concept.
Some truss rod patents were established as early as 1908, but the actual first patent was by the Gibson Guitar Company in 1921.
A truss rod is a thin metal shaft on an electric guitar that runs the neck’s length inside the fretboard, from nut to tenon or heel. (see image below)

Vertical image of an electric guitar neck & location of Truss Rod in association to Fretboard-image courses of Wikimedia- Author Mikhail Yakshin and licensed under the Creative Commons Attribution-Share Alike 3.0 Unported.
Advantages Of Truss Rods
Truss Rods allow manufacturers to create thinner guitar necks using materials that are less rigid composites or cheaper grades of wood.
All to improve playability that would typically not have been possible previously (pre-truss rod.)
These lesser materials would not handle the tension exerted by the strings without the Truss Rod Inserted.
This design also saves on labour and costs because wood is prone to bending, resulting in a guitar neck eventually warping or bending beyond repair; before truss rods, the wood needed had to be very rigid, which held its challenges. (i.e. relief setup)
What Is The Purpose Of The Truss Rod?
In both electric or steel-string acoustic guitars, the primary function of a guitar truss rod is to Stabilize the neck and counteract or compensate for the effects of high tension caused by strings/tunings or expansion or contraction due to changes in atmospheric tendencies or seasonal changes. (Temperature, humidity or lack of )
Usually, the manufacturer adjusts the truss rod of a brand-new instrument before the sale.
But any change in string gauge (higher or lower tension) or weather humidity (which can cause the neck to expand or contract) might require the neck to be adjusted.
Many players need to perform minor setups or tweaks on their guitars during the year to keep their guitar’s playability in optimal condition,
Ultimately, It’s the truss rod that keeps the neck straight.
Tensions
Tension or “pull” created by strings, gauges or tuning exerts a great deal of force on the neck of the guitar.
For example, a light gauge acoustic string can exert up to 180 pounds of pressure on the neck and bridge, and based on the thickness of the string gauge tuned to a correct pitch, this increases.
Conversely
Lowering the pitch of each string by using a different tuning reduces the string tension and will cause the neck’s relief to change.
These factors affect the instrument’s neck and playability, and the truss rod is placed there to balance out that tension either way.
Either through tightening (or loosening) the adjustable nut, the truss rod’s curvature will help minimize this bowing effect or neck bend, leaving you with the desired relief on the fingerboard.
(Relief and Bowing explained further; read on…)
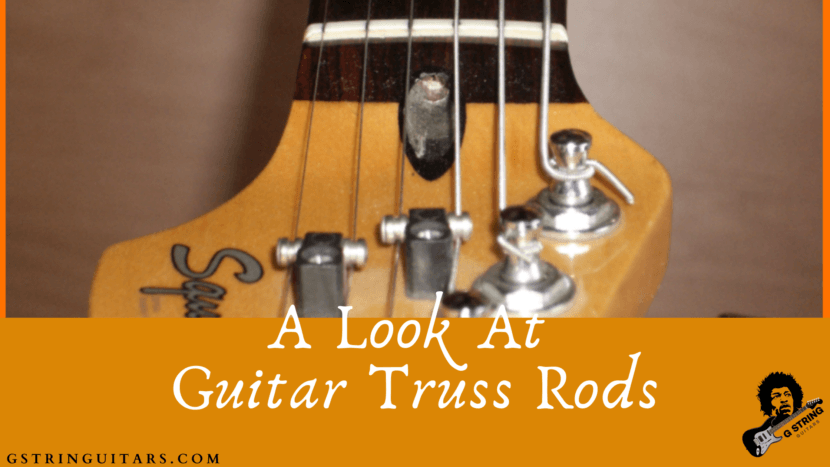
Where Is The Truss Rod Located & Accessed?
The truss rod can be accessed through a small hole behind the nut on the headstock on most electric guitars and basses, usually covered by a small piece of wood or plastic held down by screws commonly called “truss rod covers,” and can be decorative and used for branding. (see below image)

Or, on an acoustic, the adjustment bolt for the truss rod can be accessed through the soundhole. (See the below image)

Image courtesy of Wikimedia- Author Gothick & licensed under the Creative Commons Attribution-Share Alike 4.0 International
Some electric guitars and basses have truss rods that can be accessed at the heel, where the body and neck join. (see image)

The neck heel of a 1987 Fender Precision Bass with truss rod- Image courtesy of Wikimedia -Author-Tim Patterson & licensed under the Creative Commons Attribution-Share Alike 2.0 Generic
But despite the access points (headstock or heel), the truss rods work the same both ways.
Types Of Truss Rods
Single-Action Or Dual-Action
The two commonly used Truss Rods required for electric guitars are the Single-Action, also called Oneway or Double Action or Two-way Truss Rods, and many different types provide the same function.
Single Truss Rods
With a fixed nut at one end and an adjustable nut at the other end, the rod will develop a slight curvature and provide counter tension one way as the nut is tightened.
The limitation is that the single action can only correct or counterbalance the forward bow or convex direction, not the back bow.
The back bow is a condition where the neck’s straightness is higher in the middle and is most typically caused by actual warping.
Note: If you have a back bow condition, but your guitar only has a single-action truss rod, consult your luthier or guitar technician.
Duel Truss Rods
The Double-Action or Two-Way Truss Rod is also known as Dual-Action or Double Expanding.
It is a more modern design that can correct the guitar or bass neck in either direction, forward bow (convex) & backward bow (concave), creating more OR less relief.

Rickenbacker 4003 Dual Truss Rod-Image courtesy of Wikimedia- Author Roadside Guitars & licensed under the Creative Commons Attribution-Share Alike 2.0 Generic
Benefits Of The Two-Way Design
- More stable and less influenced by atmospheric tendencies or seasonal changes
- Can re-straighten twisted necks
- Ideal solution for necks that exhibit a back bow condition &
- It can be adjusted via the headstock or tenon (heel)
However, based on the design of the dual-action truss rod, some players believe there is an adverse effect on the instrument’s tone and is more challenging to adjust.
How It Works
Slight down the neck from the headstock and look to see how it is situated; if you find that your relief isn’t where it needs to be, then adjusting your truss rod follows a fairly standard process.

Turning the truss rods adjustment bolt counter-clockwise…
Loosens or decreases the truss rod’s tension, resulting in the neck responding to the tension of the strings, allowing string tension to act on the neck and creating a forward bow or higher string action.
Turning the bolt clockwise…
Tightens the truss rod counteracts the tension of the strings and straightens the neck or creates a backward bow or lower string action, reducing the amount of relief.
” Lefty-Loosey-Righty-Tighty”
Note a Neutral position has a slight forward bow-not completely flat.
This position is generally how you would like your guitar neck to look, allowing strings to vibrate freely, enabling each fretted note to have a clear shot to the bridge at all points of the neck and not create Fret Buzz. (A condition occurring when strings are too close to the frets.)
Depending on the type of the Truss Rod, a standard Hex wrench, Allen key, or Flathead can be used to adjust the tension on the adjustment bolt.
Tip
If you are going to tighten the truss rod, it is recommended to loosen the tension on the guitar strings, for keeping them in pitch could mean that this tension could affect the adjustment.
Let the neck settle in after an adjustment because it may take some time to get the full effect of the change; also, remember to tune it back to the proper pitch first before checking the relief.
This is not a factor if you try to loosen the truss rod, for the string tension will automatically be reduced.
Watch Video On Truss Rod Adjustment
Guitar Playability & The Truss Rod?
This counter-tension ability of a Truss Rod affects the guitar’s playability in 3 areas…
- Neck Relief
- Overall string action & intonation
- Bridge Setup
Neck Relief
Neck Relief refers to lengthwise forward /upward curvature or “pull” caused by the tension of the strings or a measure of how much the neck bends.
To measure relief on a guitar neck, measure the distance between the string on the 6th or 7th fret using a “Feeler Gauge” while holding down the first and 12th frets using a capo.
The relief is measured by checking the gap between the high E string on the middle of the neck (6th or 7th fret) from the top of the fret, not the fingerboard. (note the guitar is tuned to pitch)
You can adjust the truss rod (either way) based on this number to reach your desired relief.
If your guitar’s neck has too much relief, the amount of upbow will naturally make the strings higher from the fretboard and make the neck feel unnatural.
Typically, a low amount of relief (therefore, a straighter neck) will allow for lower action and make a buzz on the frets. (Fret buzz)
Adjusting a truss rod related to playability can not be overlooked, for the relief dictates the space under the string in the middle of the neck.
Regarding recommended relief standards, talk to your guitar tech about its ranges based on players’ preferences and the type of guitar.
String Action
String Action is nothing more than how high off the fretboard your strings are and how difficult it is to press down the strings to play the instrument.

What String Action on a Fingerboard looks like – Image courtesy of Wikimedia – Author- CLI & is licensed under the Creative Commons Attribution-Share Alike 4.0 International, 3.0 Unported, 2.5 Generic 2.0 Generic and 1.0 Generic license.
You Have Higher And Lower String Action.
Higher string action means you have to press down farther to fret a note than you would with the lower action.
A lower action in the high fret positions facilitates more accurate intonation with less compensation at the bridge.
You may need to adjust the neck angle or the saddle to get the action right down the neck to prevent fret buzz.
Regarding “action” on a guitar neck, it should be noted that there is no “right setting” for each player has their personal preference based on style and technique.
also
Adjusting the truss rod alone isn’t all it takes to affect a guitar’s action.
Intonation
Intonation is how your strings stay tuned as you go higher up the fretboard.
Along with action, The truss rod is not specifically for adjusting intonation; adjusting it can make an instrument more easily playable.
To get the intonation right for a particular string, move the saddle forward or backward (therefore changing the overall string length), where the note at the 12th fret is a perfect octave of the string played open.
Bridge Setup
The relief achieved from the truss rod combined with the bridge’s height affects the instrument’s playability, and the two should be in concert with each other.
Watch Video How A Truss Rod Works
Minimal Adjustments Only
Does adjusting your truss rod on your favourite axe scare you?
Ultimately, if you keep a few simple tips and recommendations in mind, this should be a straightforward process with no issues.
- Small increments only; do not adjust too much at one time; go with ⅛ to a ¼ turn at a time.
- Check your results (using the capo technique) and readjust as necessary. Getting your relief appropriately set will take some patience and a few go-arounds.
- Never force an adjustment no matter which direction you are turning; a truss rod can break if too much tension is applied – so it’s wise to adjust your truss rod in small increments continually– and to realize when the rod is maxed out.
It is near impossible to assess if your truss rod is maxed out visually, so tension is your teacher; if you have to apply a lot of tension, that is your guitar telling you there is an issue, and you could be creating a bigger problem. Some necks need more than a truss rod adjustment to get straight, and knowing when to stop is essential.
Take your guitar to a luthier if…
- You need to force an adjustment.
- If the truss rod will not move in either direction
- Turning of the nut has no effect, or
- If it feels like it is attached to nothing
Even though a broken truss rod is not very common, getting a truss rod repaired will mean having the fretboard removed. Because of the cost associated with something like this, you would most commonly install a new neck.
The real trick here is diagnosing the problem and knowing when to adjust the truss rod and when to leave it alone. (This is again where experience as a guitar tech comes into play.) for your problem may not be a truss rod issue at all.

Want More Information? For This Book And More On How To Set Up Your Guitar, Click The Image Here
Wrap Up
How can I adjust my guitar to get it to feel and sound to my liking?
Whether you want to take on the Role of Guitar Tech on your guitar or not, having a basic understanding of what a truss rod does and how it works is essential.
My thoughts are not to be afraid to try, for if it gets messy, bring it to your local guitar tech to help finish the adjustment.
By taking a few simple steps and precautions, you can easily get the guitar set up to the spot where it’s best for your needs and have the ability and know-how to make changes to keep it in tip-top shape.
Also, the debate of having a single-action as opposed to a dual-action truss rod where additional wood needs to be removed in the neck to accommodate for the duel’s extra space or weight needs to be experienced.
I would like to hear your thoughts on this.
Did You Like This Article?
Check out my Guitar Shop article on Scalloped Guitar Fretboard
Also…
Leave me your comments in the section below, and if you would like me to review a favourite guitar or have any other guitar shop questions that were not answered in the above article.
As always, stay the course and keep playing.
CTA image of How To Set Up Your Guitar Book courtesy of Amazon
![]()

Starting A Journey At 7 Years Of Age, The Love For The Guitar Only Became Stronger Going Into My Teens. This Leading To An Exciting Time Of Teaching, Performing, And Recording. Join Me Now As We Can Bring The Love Of This Instrument To Other Musicians Globally.